Showing posts with label natural building. Show all posts

Monday, August 17, 2015

Natural Cottage Project, Burton Ohio,

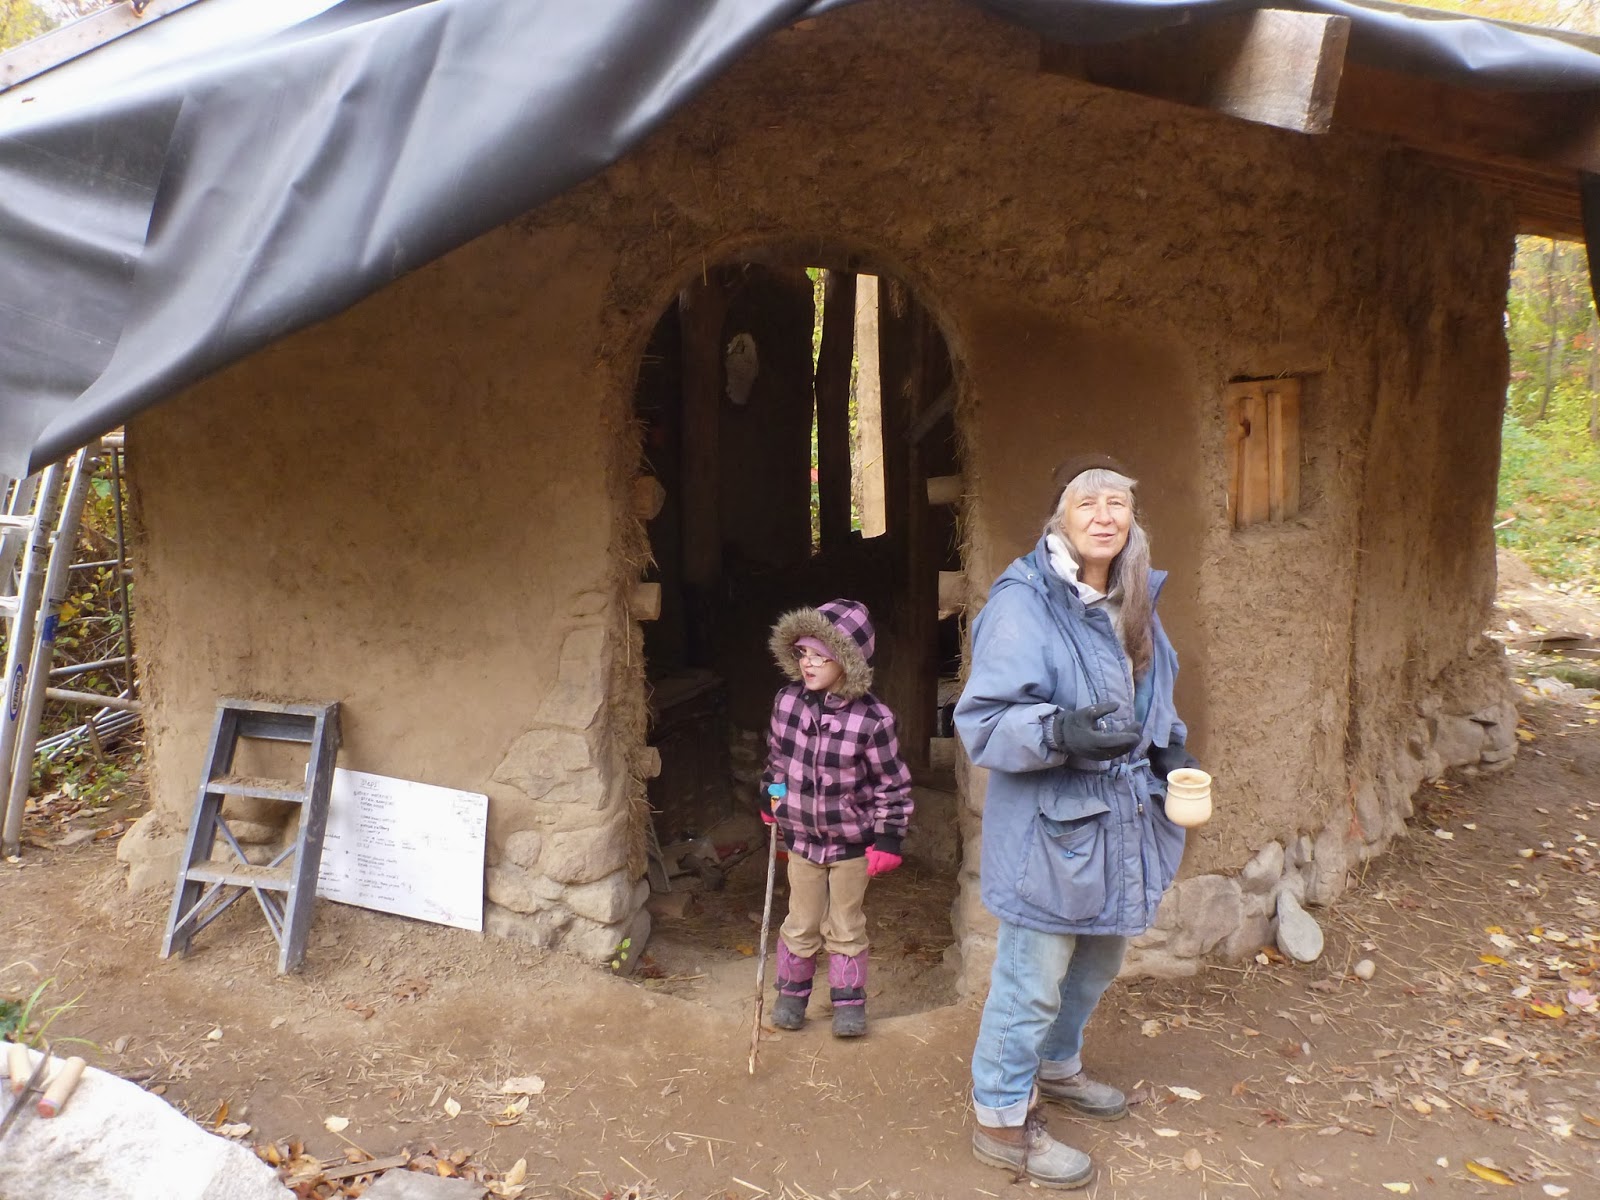
Phoenix and I have managed to meet up with our friend and natural building instructor Uncle Mud a couple of times this year. We recently were able to make it to his project in Ohio with co-Natural Cottage Project instructors Christina Ott and Deanne Bednar.

NATURAL COTTAGE INTENSIVE

CIMG9089

2 Week Cottage Build
July 10-24 2015


It is always a pleasure to see this crew. Chis' (Uncle Mud) family has a way of drawing everyone together to feel like a big family. After the build, my 8-year-old, Phoenix put together this inspiring video of her experience:


I chose not to edit because I liked it how it was ;) Great job Phoenix

Wednesday, June 3, 2015

Biochar Gypsum Plaster

A while back I spoke with my friend Uncle Mud about plasters. Somehow gypsum plaster came up. I enjoy using natural materials and know that the environmental impact is much lower when I take a shovel out to harvest my own materials from the land. Sometimes, a project really just needs to get done. So I began to test myself to discover what my building values were at the time. The curious monkey with a limited timeline won out.

I went out and bought some gypsum plaster (joint compound). The ingredients are still pretty natural, however I'm sure the processing has a higher impact. My other best option for this project was biochar lime plaster.  

Because I buy the sand from a local quarry and mix the plaster myself this cuts down on impact for lime plaster manufacture, but also requires a lot more time on my part. I am still unsure what the differences in impact are for processing of the hydrated lime versus the gypsum plaster are, but I haven't yet marked on my calendar some time to look into this ;)

The short story is, I feel I'm cheating a bit, compromising, but I'm also thankful to save some time and curious about the finished product. 
Biochar gypsum plaster instead of biochar lime plaster

If you have never worked with lime plaster before, then you should know it requires a little babying. The gypsum plaster really does not require babying, it is very user-friendly. 

I took my biochar and ground it in the blender until it was very fine, then mixed it with the gypsum plaster. It was easy and quick. After troweling it on I went back over to play with the texture and check out the thickness. 

In my first attempt I tried my friend's suggestion to add temepra paint for a beautiful color.  I added 2 cups to a small bucket. The color turned out a baby blue when dry. I decided it looked a little too artificial for me and went back over with one more time with just the plaster mixed with biochar.  Of course I love the tint that biochar gives. When damp the plaster is bluish, and it is speckled with larger black pieces if not ground too uniformly. 

Biochar is said to reduce humidity.  From my experience so far it does make a big impact.  Our house is in-ground. We have had to be careful of mold during certain seasons. So far, the rooms with biochar plaster on the walls have not had a problem with mold this year, though on a particularly rainy week we did find some mold in rooms that have previously been much less humid.  Now I want to plaster every wall with biochar.  Biochar can block certain waves and frequencies, though, so I am being selective to not block my wifi signal. 

On tinting with tempra:
I have seen some beautiful plaster tinted with tempra. From what I have read, a richer color may be reached by starting with a coat of plaster, then watering the plaster down to a paint consistency and adding the paint to this. The color then is painted on over, almost fresco style. I have yet to try this, and may soon do this with natural pigments. 


This is two coats over cinderblock. The lighting is a little strange in this picture, but the color of the plaster is uniform. I went for a bit of a scratched rugged texture, because I like my walls to make me feel like I am in a cave. The picture does not show a lot of detail, perhaps I will add a better one later. 

Lime plaster is much more durable, but definitely something I would recommend learning hands-on from someone who knows what they are doing. If you live in a warm, humid climate however lime plater becomes much easier. I found with my lime plaster that it is very important to keep it moist for a period of time, and ensure it is kept warm, with limited temperature changes to make sure it does not crack.  With the gypsum plaster, however, very cold temperatures will still cause cracking. 

This pre-made joint compound is a no brainer. Adding the biochar gives great benefits to air quality and humidity regulation, as well as adding a bit of carbon sequestering you can feel good about a small step to help with climate change. 

I like this mix. It was easy and I personally like the look. The biochar helped reduce humidity in the bathroom. When I want to work quickly I will use it again.  Still, I prefer the stone-like quality of lime plaster when I have the energy and time. 

Next time I may try a top coat of painted-on natural pigments mixed with plaster. 

Sunday, November 30, 2014

Biochar plaster

I fell in love with earthen plasters during my cob course. It is nice to have a building material that you can wash out on the ground right next to your garden. It is nice to know what is in your home is not toxic to anyone, and the production of it is not creating any toxins elsewhere in the world.

It is nice to be able to source materials locally, to dig up my materials from the ground. This is much more affordable as well.


I have worked with clay based plasters and lime based plasters, and recently was introduced to biochar plaster. At the Ecovillage Training Center at The Farm in TN, Albert is the biochar man. I have to admit a little skepticism when first introduced to the concept of biochar, but there are so many people who report amazing results that I am sold. 

Recently the permaculture apprentices at the Ecovillage Training Center applied some clay based biochar plaster in The Prancing Poet (event space).  Albert mentioned that the biochar blocks electromagnetic radiation such as those that come from computers, microwaves etc. I was curious so I looked around and found a very interesting article on biochar plaster. 

Biochar as Building Material for Optimal Indoor Climate


The article mentions that biochar plaster is being used to restore old wine cellars. It regulates humidity for the wine, helps stabilize the temperature, and filters the air. 

I had yet to complete a final plaster coat on the cob bench around our woodburning stove, so I decided to do my own experiment.

I chose to use a 50/50 lime and masonry sand mix. with at least 20% biochar. The biochar was beautiful when wet, bluish-black. As lime plaster does, the biochar mix still smoothed into a nice finish after burnishing, looking almost like stone. 

I did have to baby the plaster a bit because humidity was low in the cold air, and I wanted to keep the cob at an ideal temperature for lime plaster curing so that I did not get large cracks (the last lime plaster I did was in ideal humidity and temperature and did not require water spritzing regularly as this mix did).

The plaster turned out great. I head to leave and come back to the Ecovillage Training Center, so I asked my husband to continue to spritz it for a week and keep an eye on it, then slowly decrease frequency of spritzing while it cured the our cold temperature with the stove running. I am very curious of the effect of the humidity regulating biochar on the lime plaster, but would need to try the plaster in different conditions to know that the change was related to the biochar in particular. 

I hear it is doing great and am looking forward to further biochar plaster on the walls. I will be keeping an eye on summer humidity in our home. I am looking forward to some changes in this!

Next time: More fibers, try a natural tint, do this plaster when it is warmer out!

Wednesday, July 16, 2014

Mosaic story floors


I started tiling last year when Sarah Haas came through and showed me what she leaned with Dan Phillips, other tilers, and then through trial and error of her own professional tiling efforts. She showed me how to tile with commercial thin-set mortar and grout with scrap tile. I decided that I wanted to complete the stairs with scrap tile and bottle caps. 

This year I started a new project involving bottle bottoms. I cut the bottom off of beer bottles with a tile saw and mortared them in.  To strengthen the bottoms (even though they are pretty flat) I filled them in with mortar as I set them. 

As always I had to try new things. I started with the thin-set mortar for tiles, but remembered how easily some of the tiles on the stairs had popped out pre grout. Instead, I grabbed a bag of premixed brick style mortar.  Once dry these tiles were not going anywhere. Thin-set mortar allows future changes if you may want to scrape everything up and try again, but after this much work with mosaic, I can't imagine wanting to redo the floor. 

I then mixed my own mortar for a bit, with local masonry sand from the quarry and a bag of portland cement. I found with this that sometimes there were still small pebbles that would make an uneven setting for the tiles and they would pop out. Next time I use this sand I will pre-screen.  Darrell, a contractor staying at moonCat right now, brought a bucket of fine sand scooped from a local property. Even though this contained a small amount of silt the mix held great, and this was my absolute favorite, until the cats found the bucket and made it into a litter box.

I did consider using an earthen plaster of clay, sand, starch, matrix material (such as straw, manure, etc.) and water. I decided against this because the house is in the ground. If by chance flooding occurred, I would need to redo the natural plaster and tile. With the amount of time I put into mosaic work, I think I will seek sustainability by using materials that will not need to be continually consumed, but will last for a long time (use of portland cement instead of natural plaster).

I did start with commercial grout, and decided to end with commercial grout, but recently spoke with a friend about mixing my own. My friend Michael (that I met at Earthships) recommended a fine sand mix very similar to the actual mortar I was making. He said mixing in the structural poly fibers used for cement may help prevent cracking. I may play with adding lime to the grout as well. At The Farm Ecovillage Training Center I had seen that the home Albert Bates was staying in had bottle caps laid in a lime plaster, but it did not hold well. Perhaps a mix of some portland and lime . . . and a little soaked sawdust?

I prefer to use natural or "waste" materials when possible. With this floor I used scrap tile from a mix of other contractors, the Habitat For Humanity Re-Store, and bottles and bottle caps that were being thrown away from local bars. I will admit that on one dark and frustrating night I decided to "Just finish it quickly!" by laying actual square tile bought from a store and did buy a couple of boxes of cheap tile.

I have come to realize that my tiling values include local material sourcing and waste/recycled materials as much as possible, but also there is a measure for my time and effort. I wanted to make the tree much larger with the bottle bottoms, but this is very time intensive.  I pushed myself for long days to complete the mosaic tile quickly and used all of my great TFH kinesiology pain releasing techniques to support days of statically bending over and mortaring in bottle caps and bottle bottoms. The tile portions go very quickly and are not quite so static. 

I can thank craigslist, local bars, and local flooring contractors for most of my tiling material! Thanks to Phoenix for all of her help placing bottle caps, and WWOOFer Chris Burke for hours of helping me to cut bottle bottoms.

I really enjoyed this project and have found it very rewarding. I am looking forward to more! As little girls at moonCat plot about who will own the house when I die I feel that my mosaic story floors can promote inspiration, creativity, culture beyond my lifetime. 


Wednesday, January 8, 2014

The Farm

When I took my cob course in Tennessee this past October I noticed that an eco-village training center I had seen online was a close drive.  We had one day off in the middle of our course and a couple of my fellow eco-geek girls came along to check out The Farm with me.

Now, as much as I am interested in intentional community and eco-villages I get a little uncomfortable with words like commune and fascism. Though, realistically if you dive into philosophy of fascism versus what has actually played out it really is full on interesting concepts, and really, what was Marx actually saying? Fun debates.

 I want to live somewhere that people share because they choose to, where independence is valued, but community flows freely as choice.  Somewhere that people are valued and supported to realize their full creative potential by rising above the rat race and ensuring basic needs are met; these are the strengths I see in a sharing community. These are things I have gained from intentional communities in the past, though I have never been a member of a common purse. And while I'm on a role, I think that it is more important to realize my own equality and see what flows from there than to assume "the man" owes me equality.  I do, however, have respect for those that strive for equality and create communes that work and create conscious change, but have seen a lack of individual "ownership" transfer to a lack of respect for property, and sometimes scarcity. This is where my mind flows when I think of "communes".

 Stained glass dome at The Farm


I am intrigued by the story of The Farm as it morphed from commune, to intentional community to become self-supporting. Googling for more precise definitions I found this fun link to explore the definitions at planetfriendly.net

The eco-village training center at The Farm has a number of natural building projects going. I bumped into Jason "the green resourcerer" and he explained one of the eco-village projects to me that included fun building techniques I am interested in like straw slip, in-floor heating, more cob, bamboo, cordwood, and sawdust for insulation.  They were using cordwood to tie together two layers of cob with a space in the middle filled with sawdust for insulation.

Lion sculpted out of cob


The Farm has so much interesting history to share with anyone interested in different forms of sharing economies from co-housing to full blown communes. Now it has a midwifery center (that I did not get to visit yet) and the visitor's center is full of interesting resources . . . I just wanted to take pictures of the bookshelves and start googling subjects & authors . . .and a bookstore where I got one of my new favorite books Ecocities, rebuilding cities in balance with nature by Richard Register. 

 Slip straw I have been told works well as insulation

Cob sculpted fireplace 

Compost toilets & solar shower with Dawn

I would love to go back and experience more of their eco-village training center, natural building, vehicle conversion, and midwifery clinic.


Friday, December 6, 2013

the Strawbale Studio part II

Here is a video I found online where Deanne gives a brief tour of The Strawbale Studio.
She is offering internships in January and Feburuary!


This is a picture inside The Strawbale Studio sculpted out of cob. I like the branch added at the top. 
Deanne and Phoenix in front of the in-progress hobbit sauna.


Holes for pipe inside the sauna where the wood burning stove will go. 

A fish sculpted on the side of the rocket stove.


A spiral hut

A soon to be children's house 

Inside the children's house. The floor has the exhaust of the rocket stove running through heating it.

 Deanne at her rocket cookstove made of thrown together bricks
One thing I love about Deanne--everything is useful and everything is art.

Tuesday, October 15, 2013

Building with Cob

This year I participated in the Natural Cottage Workshop from September 28-Oct 11.  http://naturalcottageproject.com/wordpress/
We built a cob cottage from foundation to rafters during this time and learned about how to go about putting in, or having the main systems put in, as well as discussing building permits and codes.  There were design nights where individuals presented their plans an got feedback from the experts and other members of the group. Overall the course was thorough and informative and we all left feeling we had gained family. 
 We started with the foundation. The purpose of the foundation is to keep water away from the cob.  Start by digging a trench, next add drainage with gravel and a drainage pipe/hose that slants away from the structure. The stem wall/knee wall needs to be 14-24 inches above grade.  We completed the stem wall with natural stone and a basic cement mortar.

 On day 2 we began mixing cob by foot. The mix was 2:1. 2 buckets of a sharp sand (here manufactured sand because it is very sharp and will hold together well) and 1 bucket of clay. Add water to desired consistency. We stomped and pushed the mix until it began to burrito when we lifted the tarp over. Next straw was added. To mix in the straw we used twisting movements.
 The stone was wet with a brush or sponge and cob was laid onto it ensuring a level surface with no slumping shoulders. We left overhang on purpose so that it could be trimmed back to a more level surface and reduce the number of plaster coats required later.
 At the end of the day this "spine and ribs" pattern left on top allowed quicker drying and quicker building the next day. Each day we could plan to build about 2ft higher. If too much wet cob is added the wall may slump and/or fall.
 Here is a gringo block. This wooden block set in the wall allows for attachments. Gringo blocks may be set in a cob wall every 2ft where an interior wall will be to allow for attachment.
 This is a drawing from lecture. On the bottom is a drawing of how to build on cob walls. The center of the three pillars shows shouldering (bad).
 Here Christina is showing window placement with leveling an temporary supports until the windows are cobbed in.  The windows have extra wood on the sides to key into the cob. A lintel will be placed over the windows to spread the load of the roof. Every column of cob that carries a load needs to be at least 2ft.
 Here Christina is showing us "speed cobbing" where someone is throwing her chunks of tractor mixed cob and she is quickly thumbing in large amounts.
 Our wall is growing!
 Gringo blocks are attached to the side of this cabinet that is being cobbed into the wall, saving time and space.  The wooden blocks securely key the cabinet into the cob.

 The back of the cabinet has strings and wood to hold the cob. The smooth wood on the back of the cabinet will not hold the cob as well as the pointy sticks and string.
 The front window area will have a built in bench.
 We stripped, snedded, cleaned, and ground these poles. Then we learned to gouge the rafters to fit onto the main beams.

 Here a cedar post was cut and sanded then oiled with a linseed oil blend to act as a lintel.
 I snuck this picture in from another building. This cob fireplace heated the room on a rainy night and at breakfast the next morning the thermal mass of the fireplace and the roof were still letting off heat even though the building had open doors and windows. Here we worked on a cob floor and laid some earthen tile into the cob as well.

 The bench and window area with lintels. I got to put in a shallow niche for some unsuspecting window bench reader to place her coffee on in the future.
My first niche!
 This is where we got! Looking beautiful.
This workshop was a great experience and I plan to be blogging soon about my cob adventures at moonCatlife!